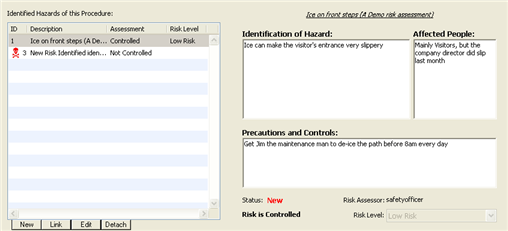
Each Procedure can have one or more identified Hazards linked to it. Each Hazard can be managed and assessed seperately from the Procedure. Each Hazard has its own Risk Assessment and Risk Level. The following options are available for using Hazards in a Procedure.
New: create a new hazard and link it to the current Procedure
Link: open the Hazard Picker and choose from available Hazards to link to the current Procedure
Edit: open and edit the selected Hazard from the Procedure's Identified Hazard list.
Detach: un-link the selected Hazard from the current Procedure. This does not delete the Hazard from the database but only removes it from the Procedure.
![[Caution]](images/caution.gif) | Caution |
|---|---|
Changing a Hazard's Assessment or Risk Level can affect the overall Risk Assessment of a Procedure that links to that Hazard. Be sure to pay attention to which Procedures are using a given Hazard before you make changes to it. |
Not all Hazards may be suitable for use with a Procedure. In this case the Hazard is marked as not usable by Procedures and will not appear in the Hazard Pick List. A single Hazard can be used in more than one Procedure.
By clicking on a Hazard in the list of Identified Hazards, additional information will be shown to the right of the list. This information will give more information on the selected Hazard such as a detailed description, the affected people, precautions and controls, the status and the name of the user who assessed the risk of the Hazard.
If the Hazard is not controlled then it will cause a warning to appear in the Procedure window. In this case a Safety Officer or Assessor should put the Hazard into a controlled state before starting a work process which includes that Hazard.
More information on Hazard management can be found in the section called “Hazard Management”.
